上班族

 找回密码
 立即注册
12
返回列表 发新帖
楼主: gameboy

NES 模拟器开发教程

[复制链接]

76

主题

122

帖子

991

积分

高级会员

Rank: 4

积分
991
 楼主| 发表于 2022-9-25 10:39:55 | 显示全部楼层
NES 模拟器开发教程 10 - PPU 时序
时序在 08 节已经简单介绍过了,可能在那时候还看不懂,经过 09 节了解 Name table,Attribute table 等行为之后,再来看时序图就能理解了
22600211-c6354bef317c9757.png
NES PPU 时钟为 CPU 的 3 倍,每一个 PPU 时钟扫描一个点,每一帧一共扫描 262 行,每一行扫描 341 个点,并且只有在扫描线 0 - 239 的 1 - 256 点可见
除了(0, 0)以外,每行第一个点不做任何事情,(0,0)会在使能背景显示并且在奇数帧时跳过
像素读取

图中的黄色部分每 8 个点看作一个单位:
  • 时钟 0 - 1 取 Name table 数据
  • 时钟 2 - 3 取 Attribute table 数据
  • 时钟 5 - 6 读取 tile 低 8 位
  • 时钟 7 - 8 读取 tile 高 8 位
读取的数据会进入锁存器,然后每一个时钟进入移位寄存器,以提供绘图使用,数据读取方法和锁存器在 NESDEV 上已经提供了伪代码了,这里不再重复,参考:
http://wiki.nesdev.com/w/index.php/PPU_scrolling
http://wiki.nesdev.com/w/index.php/PPU_rendering
每一个可见的时钟都会从移位寄存器取出 palette index,进行绘图。图中一些不可见的时钟也存在取数据的操作(比如 321 - 340),这是因为需要预先将移位寄存器塞满
中断

图中可以看到,在 scanline 240 cycle 1 时,有一个 set VBlank flag 的操作,这时候会将 PPU 寄存器中的 VBlank 标志置位,并且如果 PPUCTRL 中使能了中断,会向 CPU 触发一个 NMI 中断提醒 CPU 进行绘图更新,最后会在 scanline 261 cycle 1 时清除 VBlank
回复 支持 反对

使用道具 举报

76

主题

122

帖子

991

积分

高级会员

Rank: 4

积分
991
 楼主| 发表于 2022-9-25 10:41:12 | 显示全部楼层
本帖最后由 gameboy 于 2022-9-25 10:43 编辑

NES 模拟器开发教程 11 - PPU 精灵
了解 background 如何绘图之后,sprite 也就简单一些了
1. OAM

细心的人可能会注意到,结合到 PPU 内存映射时会发现,PPU 总线上没有和 sprite 直接相关的信息
  • pattern table:存储图像数据
  • name table:存储 background 在 pattern table 的索引
  • palette:调色板
以上数据没有任何一个指明了 sprite 的信息,那么 sprite 信息是放在哪里的?
这里就要提到 OAM 了,OAM 全称 Object Attribute Memory,位于 PPU 芯片中,一共 256 bytes,一个 sprite 用 4 bytes,所以总共能表示 64 个 sprite。但是 OAM 并不存在于 PPU 或 CPU 总线上,需要 CPU 通过 PPU 寄存器或者 DMA 方式才能写入
  • 寄存器写入
    通过 OAMADDR(0x2003)OAMDATA(0x2004) 写入 OAM 数据,写入前首先通过 OAMADDR 写入起始地址,之后通过 OAMDATA 写入数据,数据可以连续写入,每写入一次地址自动 1
  • DMA 写入
    通过 OAMDMA(0x4014) 写入 CPU PAGE 地址,之后 DMA 会自动将 CPU 整个 PAGE 的数据拷贝到 OAM 中。CPU PAGE 为 256 bytes,比如往 OAMDMA 写入 2,则会将 CPU 总线上的 0x200 ~ 0x2FF 的数据拷贝到 OAM。另外,DMA 会占用 512 个 CPU 时钟(奇数 CPU 周期还会再加一个时钟,前期可以先不考虑)
    DMA 写入速度快于寄存器写入,所以追求效率的时候会采用此方式
2. Sprite 数据

一个 Sprite 在 OAM 中需要 4 bytes:
  • Byte 0:
    Sprite 的 Y 坐标
  • Byte 1:
  • 76543210
    ||||||||
    ||||||| - Bank ($0000 or $1000) of tiles
    -- Tile number of top of sprite (0 to 254; bottom half gets the next tile)
    该字节类似于 name table,sprite 有 2 种模式:
    • 8 x 8
      整个 byte 类似于 name table,由 PPUCTRL 的 bit 3 选取 bank 之后,加上自身数据 x 16 得到偏移量
    • 8 x 16
      该模式下 PPUCTRL 的 bit 3 不再起作用,bank 由 bit 0 决定,并且偏移量不再是 x 16,而是 x 32,具体参考 http://wiki.nesdev.com/w/index.php/PPU_OAM,讲得非常清楚
  • Byte 2:76543210|||||||||||||| - Palette (4 to 7) of sprite||| --- Unimplemented|| ------ Priority (0: in front of background; 1: behind background)| ------- Flip sprite horizontally -------- Flip sprite vertically
    bit 0-1 决定高 2 bit 的 palette,类似于 attribute table 的功能
    bit 5 决定优先级,如果 sprite 像素和 background 像素都不是透明像素的情况下(即 palette index % 4 != 0),则决定了到底显示 sprite 还是 background
    bit 6-7 决定是否翻转像素,比如人物往右走设置为不翻转,往左走则设置为垂直翻转
  • Byte 3:
    Sprite 的 X 坐标
3. Sprite 0 hits

Sprite 有一个非常特殊的地方,叫 精灵 0 命中,如果不实现这个功能的话,很多游戏都没法正常运行,比如马里奥 1,没实现的情况下,会一直卡在主界面
该功能的作用是,如果 PPU 在渲染的时候,如果 background 的不透明像素与 sprite 0 的不透明像素重叠的时候,会产生 sprite 0 hits,并且在当前帧只会产生一次
同时,产生 hit 也是有条件的,具体参考:http://wiki.nesdev.com/w/index.php/PPU_OAM#Sprite_zero_hits
那么它的作用是什么?主要用来分割屏幕。之前在 background 时介绍过,CPU 通过 PPUSCROLL 来控制背景移动,但是如果希望屏幕上半部分静止,下半部分移动呢?比如马里奥 1:
22600211-0a1bb7ed3a8c4829.gif

可以看到顶部的状态栏始终是静止的,如果 CPU 不知道 PPU 绘制到哪里的情况下,这个功能没有办法实现。通过 sprite 0,放置一个 sprite 到需要的地方,产生 hit 之后,CPU 再修改 PPUSCROLL,就能达到屏幕分割的效果了
4. 时序

这个图前面 2 章看过好几遍了
22600211-c6354bef317c9757.png
相对于 background,sprite 时序简单一些
sprite 只在 pre-render line 和 visible line 求值,在 visible line 与 background 一起渲染
PPU 内部有一块 Secondary OAM 内存,大小为 4 * 8 = 32 bytes,用来存储当前扫描线上的 8 个 sprite,这也从侧面说明:PPU 最多支持 8 个 sprite 在一条 scanline 上
  • Scanline 的 1 - 64 周期,会清空 Secondary OAM,将 Secondary OAM 的值全写为 0xFF
  • Scanline 的 65 - 256 周期,对下一条 scanline 的 Secondary OAM 求值,遍历 OAM 内存,将符合对应 scanline 的 OAM 写入 Secondary OAM
  • Scanline 的 257 - 320 周期,通过 Secondary OAM,计算对应 scanline 的 OAM 像素值,用于之后的渲染
详细操作参考:http://wiki.nesdev.com/w/index.php/PPU_sprite_evaluation
5. 总结

至此 PPU 的原理已经全过了一遍了,sprite 内存数据和显示这里也就不展示了,和 09 章对 background 数据举例的流程相同。另外代码也就不举例了,PPU 相比 CPU 确实复杂太多,没法切分为小段代码。最好结合 fceux 强大的调试功能,结合源码查看
回复 支持 反对

使用道具 举报

76

主题

122

帖子

991

积分

高级会员

Rank: 4

积分
991
 楼主| 发表于 2022-9-25 10:44:14 | 显示全部楼层
NES 模拟器开发教程 12 - 输入设备
NES 支持许多设备,最常见的还是官方手柄,它有 8 个按键:
  • A
  • B
  • SELECT
  • START
  • UP
  • DOWN
  • LEFT
  • RIGHT
读取的时候比较奇怪,按道理来讲 8 个按键刚好可以用 1 个 byte 表示,读一次就可以了,但是 NES 读取的时候却是串行的,读 8 次,每次读一个按键,这样做应该是为了兼容性第三方控制器
1. 寄存器
手柄的寄存器位于 CPU 总线的 0x4016 和 0x4017,分别对应 1P 和 2P
7  bit  0---- ----xxxx xxxS        |         - Controller shift register strobe
寄存器只有 bit 0 有效,做为选通标志。当写入选通为 1 时,则可以通过读取寄存器,每次返回一个按键状态,下一次读取返回下一个按钮状态。当写入 0 时,offset 被置位,再次选通读取时会重新从第一个按钮读取
需要注意的是,只能往 4016 写(写 4017 给 APU 用了),读可以往 4016 和 4017 读。写 4016 时,对两个手柄都有效,读时则 4016 为 P1,4017 为 P2
2. 按钮映射
按钮对应的比特位为:
bit
7
6
5
4
3
2
1
0
button
A
B
Select
Start
Up
Down
Left
Right
3. 实现
手柄实现非常简单,只需要读写和更新按钮状态的函数
export enum StandardControllerButton {
  A = 0x80,
  B = 0x40,
  SELECT = 0x20,
  START = 0x10,
  UP = 0x08,
  DOWN = 0x04,
  LEFT = 0x02,
  RIGHT = 0x01,
}

export class StandardController implements IStandardController {
  private data: number;
  private isStrobe = false;
  private offset = 0;

  public updateButton(button: StandardControllerButton, isPressDown: boolean) {
    if (isPressDown) {
      this.data |= button;
    } else {
      this.data &= ~button & 0xFF;
    }
  }

  public write(data: uint8) {
    if (data & 0x01) {
      this.isStrobe = true;
    } else {
      this.offset = 0;
      this.isStrobe = false;
    }
  }

  public read(): uint8 {
    const data = this.isStrobe ? this.data & StandardControllerButton.A : this.data & (0x80 >> this.offset );

    return data ? 1 : 0;
  }
}
回复 支持 反对

使用道具 举报

76

主题

122

帖子

991

积分

高级会员

Rank: 4

积分
991
 楼主| 发表于 2022-9-25 10:45:41 | 显示全部楼层
本帖最后由 gameboy 于 2022-9-25 10:48 编辑

NES 模拟器开发教程 13 - APU 简介
通过前面的教程基本已经能玩游戏了,但是有音乐才算得上完整,下面介绍 NES 的 APU
1. 简介

APU 和 PPU 一样,也是比较复杂的芯片,和 PPU 比起来简单一些,但是比 CPU 复杂,毕竟不具备通用性
APU 有 5 通道,2 个方波,1 个三角波,1 个噪声,1 个 DMC
注:DMC 全称为 delta modulation channel,它用来产生方波,三角波,噪声产生不了的声音,声音信息提前存入 rom 中,不考虑精度的情况下,可以生成任意波形,比如鼓声这种复杂的声音,就得用 DMC
NES 有 4 bit DAC,故电压范围为 0 - 15,但是 DMC 除外,它有 7 bit,范围为 0 - 127
注:DAC 叫 “数模转换器”, 作用是把数字量转化为模拟量(电压),音频信号就是典型的模拟信号,其电压随时间变化,所以通过 DAC,可以通过数字的方式生成音频信号。
APU 寄存器分布如下:
通道
地址
操作
方波1 (pulse1)
0x4000 - 0x4003
w
方波2 (pulse2)
0x4004 - 0x4007
w
三角波 (triangle)
0x4008 - 0x400B
w
噪声 (noise)
0x400C - 0x400F
w
DMC
0x4010 - 0x4013
w
状态寄存器
0x4015
rw
帧计数器
0x4017
w
2. 时钟
声音有长有短,频率也在时刻变化,这些都需要时钟来提供,APU 有两个时钟:
  • 基本时钟(APU 周期):CPU clock / 2
    用于控制波形频率
  • 帧计数器:240Hz
    用于控制波形持续时间
3. 状态寄存器

由于 APU 有多个通道,所以提供了专门的 状态寄存器 用于控制通道使能和读取通道相关信息
  • 写 0x4015
    BIT
    作用
    0
    使能方波 1
    1
    使能方波 2
    2
    使能三角波
    3
    使能噪声
    4
    使能 DMC
    5
    -
    6
    -
    7
    -
  • 读 0x4015
    [td]
    BIT
    作用
    0
    方波 1 长度计数器不为 0
    1
    方波 2 长度计数器不为 0
    2
    三角波长度计数器不为 0
    3
    噪声长度计数器不为 0
    4
    DMC 长度计数器不为 0
    5
    -
    6
    帧中断
    7
    DMC 中断

读 0x4015 后,会清除 帧中断 标志
4. 帧计数器帧计数器

位于地址 0x4017,用来驱动各通道的长度,包络等单元。该寄存器只用了 2 个 bit,分别控制中断使能与步进方式:
BIT
作用
0
0:4 步模式,1:5 步模式
1
中断禁止标志,0:使能中断,1:禁用中断
2 - 7
-
这里肯定有人不理解什么是 4 步 5 步模式,还记得前面时钟部分讲到有 240Hz 的时钟吗?该时钟每周期会步进一次,如下:
4 步模式
5 步模式
功能
- - - f
- - - - -
产生中断
- l - l
- l - - l
驱动长度计数器(Length counter)和扫描单元(Sweep)
e e e e
e e e - e
驱动包络(Envelope)与线性计数器(Linear counter)
注:长度计数器,包络等概念一会再讲
比如,如果当前为 4 步模式,则驱动包络与线性计数器的频率为 240Hz,产生中断的频率为 60Hz,驱动长度计数器和扫描单元的频率为 120Hz
用代码实现也很简单,用 switch case 就行:
  // processFrameCounter 调用频率为 240Hz
  private processFrameCounter(): void {
    if (this.mode === 0) { // 4 Step mode
      switch (this.frameCounter % 4) {
        case 0:
          this.processEnvelopeAndLinearCounter();
          break;
        case 1:
          this.processLengthCounterAndSweep();
          this.processEnvelopeAndLinearCounter();
          break;
        case 2:
          this.processEnvelopeAndLinearCounter();
          break;
        case 3:
          this.triggerIRQ();
          this.processLengthCounterAndSweep();
          this.processEnvelopeAndLinearCounter();
          break;
      }
    } else { // 5 Step mode
      switch (this.frameCounter % 5) {
        case 0:
          this.processEnvelopeAndLinearCounter();
          break;
        case 1:
          this.processLengthCounterAndSweep();
          this.processEnvelopeAndLinearCounter();
          break;
        case 2:
          this.processEnvelopeAndLinearCounter();
          break;
        case 3:
          break;
        case 4:
          this.processLengthCounterAndSweep();
          this.processEnvelopeAndLinearCounter();
          break;
      }
    }
  }
5. 单元

前面已经见过了长度计数器(Length counter),扫描单元(Sweep),包络(Envelope),线性计数器(Linear counter),每个通道都包含部分上述单元,每通道的单元都可以由该通道的寄存器控制,单元列表如下:
通道
单元
方波1 (pulse1)
Timer, length counter, envelope, sweep
方波2 (pulse2)
Timer, length counter, envelope, sweep
三角波 (triangle)
Timer, length counter, linear counter
噪声 (noise)
Timer, length counter, envelope, linear feedback shift register
DMC
Timer, memory reader, sample buffer, output unit
  • Timer
    每个通道都有,它使用基本时钟(CPU clock / 2),用于控制波形频率
  • Length counter(长度计数器)
    除 DMC 外其他通道都有,用于控制波形持续时间
  • Envelope(包络)
    只有方波和噪声通道有,用于控制音量随时间的变化的情况,比如车离你越来越远,音量越来越小的场景
  • Sweep(扫描单元)
    只有方波通道有,用于控制声音频率随时间变化,可以想象下汽车车速越来越快时发动机声音越来越尖的场景
  • Linear counter (线性计数器)
    只有三角波通道有,与 Length counter 一样,也用来控制音频持续时间。肯定有人会问这样功能不就重复了吗。其实结合前面的 4 步与 5 步序列我们可以发现,Linear counter 一个周期处理 4 次,Length counter 一个周期只处理 2 次,这样 Linear counter 的精度就是 Length counter 的 2 倍,可以做更高精度的定时
  • linear feedback shift register(线性反馈移位寄存器)
    只有噪声通道有,用来发生伪随机数,以此来产生噪声
  • Memory reader(内存读取单元)
    只有 DMC 通道有,读取总线上编码好的数据到 sample buffer
  • Sample buffer(采样缓冲)
    只有 DMC 通道有,缓冲 DMC 数据
  • Output unit(输出单元)
    只有 DMC 通道有,用于生成音量数据
6. 混音器

复杂的音乐是有各t种音色组合起来的,APU 5 个通道充分运用才能发出动听的音乐。混音器就是用来组合 5 个通道音频整合后输出一个信号的东西
下列公式会将 5 个通道声音整合后输出为一个范围 0 ~ 1.0 的信号:
output = pulse_out tnd_out

                            95.88
pulse_out = ------------------------------------
             (8128 / (pulse1 pulse2)) 100

                                       159.79
tnd_out = -------------------------------------------------------------
                                    1
           ----------------------------------------------------- 100
            (triangle / 8227) (noise / 12241) (dmc / 22638)
具体参考 http://wiki.nesdev.com/w/index.php/APU_Mixer
在模拟的时候混音器有两种实现方式:查表和直接计算,直接计算代码最简单:
    output = pulse_out tnd_out
   
    pulse_out = 0.00752 * (pulse1 pulse2)
   
    tnd_out = 0.00851 * triangle 0.00494 * noise 0.00335 * dmc
回复 支持 反对

使用道具 举报

76

主题

122

帖子

991

积分

高级会员

Rank: 4

积分
991
 楼主| 发表于 2022-9-25 10:49:09 | 显示全部楼层
本帖最后由 gameboy 于 2022-9-25 10:52 编辑

NES 模拟器开发教程 14 - APU 方波
1. 简介

方波波形很简单,只有高低变化,波形如下
    ----     ----     ----
    |    |    |    |    |    |
    |    |    |    |    |    |
    |    |    |    |    |    |
----     ----     ----     ----
方波有几个属性:
  • 频率
    对应高低变化的频率
  • 峰值
    方波的高度,也就高低电压的差值
  • 占空比
    高电压在整个周期中的占比,例如占空比 25% 如下:
           --        --        --
           |  |          |  |         |  |
           |  |          |  |         |  |
           |  |          |  |         |  |
    ------    ------    ------    ----
NES 中存在两个方波通道,除了 sweep 的行为有一点点区别以外,其它都是一样的
2. 寄存器
注:本章建议结合后面的时序图一起看
每个方波通道需要 4 个寄存器,通道 1 寄存器地址为 0x4000 到 0x4003,通道 2 寄存器地址为 0x4004 到 0x4007,两个通道寄存器功能都一样
  • 0x4000 / 0x4004
    比特位:DDlc.vvvv
    • DD
      用于索引占空比表,占空比表如下:
    • [
        [0, 0, 0, 0, 0, 0, 0, 1],
        [0, 0, 0, 0, 0, 0, 1, 1],
        [0, 0, 0, 0, 1, 1, 1, 1],
        [1, 1, 1, 1, 1, 1, 0, 0],
      ];
      该位可以索引到具体的表,然后 timer 分频后每个 tick 按照表中的序列使用 0 或 1 与音量相乘
    • l
      表示 envelope loop 标志
    • c
      表示是否为常量音量
    • vvvv
      如果 c 置位,表示音量大小,否则表示 envelope 的分频计数
  • 0x4001 / 0x4005
    比特位:EPPP.NSSS
    • E
      表示是否使能 sweep
    • PPP
      sweep 的分频计数
    • N
      sweep 是否为负,用来控制频率随时间增大还是减小
    • SSS
      位移量,用于每个 sweep 周期将 timer 右移对应的位移量得到增量
  • 0x4002 / 0x4006
    比特位:LLLL.LLLL
    • LLLLLLLL
      timer 的低 8 位(一共 11 位,用于将 cpu 二分频后的时钟继续分频)
  • 0x4003 / 0x4007
    比特位:llll.lHHH
    • lllll
      length counter 分频计数
    • HHH
      timer 的高 3 位,和 0x4002 / 0x4006 组成完整的计数
3. sweep 区别
前面讲过两个 channel 在 sweep 的时候有一点点区别,这里解释下:
当负数标志置位后,channel 1 在 sweep 的时候会多减 1,比如算出来 sweep 为 -10,则 channel 1 timer - 11,channel 2 timer - 10
4. 时序

以通道 1 为例,整个时序如下:
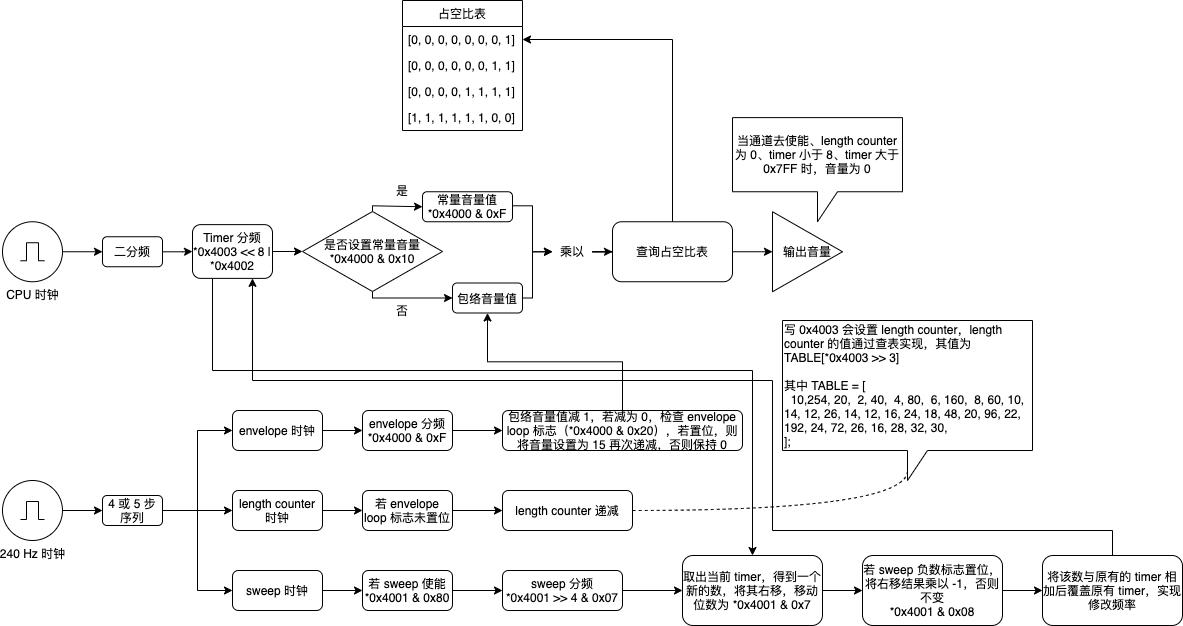
22600211-1f252c622f3258f9.png
4. 实现

示例代码如下:
import { uint8 } from '../api/types';
import { IChannel } from '../api/apu';
import { DUTY_TABLE, LENGTH_TABLE } from './table';

export class Pulse implements IChannel {
  public volume = 0; // 0-15
  public lengthCounter = 0; // 5bit

  private duty = 0; // 2bit
  private isEnvelopeLoop = false;
  private isConstantVolume = false;
  private envelopeValue = 0; // 4bit
  private envelopeVolume = 0; // 4bit
  private envelopeCounter = 0;

  private isSweepEnabled = false;
  private sweepPeriod = 0; // 3bit
  private isSweepNegated = false;
  private sweepShift = 0; // 3bit
  private sweepCounter = 0;

  private timer = 0; // 11bit

  private internalTimer = 0;
  private counter = 0;

  private enable = false;

  constructor(
    private readonly channel: number,
  ) {}

  public get isEnabled(): boolean {
    return this.enable;
  }

  public set isEnabled(isEnabled: boolean) {
    this.enable = isEnabled;
    if (!isEnabled) {
      this.lengthCounter = 0;
    }
  }

  public clock(): void {
    if (!this.isEnabled) {
      return;
    }

    if (this.internalTimer === 0) {
      this.internalTimer = this.timer;
      this.step();
    } else {
      this.internalTimer--;
    }
  }

  public processEnvelope(): void {
    if (this.isConstantVolume) {
      return;
    }

    if (this.envelopeCounter % (this.envelopeValue 1) === 0) {
      if (this.envelopeVolume === 0) {
        this.envelopeVolume = this.isEnvelopeLoop ? 15 : 0;
      } else {
        this.envelopeVolume--;
      }
    }

    this.envelopeCounter ;
  }

  public processLengthCounter(): void {
    if (!this.isEnvelopeLoop && this.lengthCounter > 0) {
      this.lengthCounter--;
    }
  }

  public processSweep(): void {
    if (!this.isSweepEnabled) {
      return;
    }

    if (this.sweepCounter % (this.sweepPeriod 1) === 0) {
      // 1. A barrel shifter shifts the channel's 11-bit raw timer period right by the shift count, producing the change amount.
      // 2. If the negate flag is true, the change amount is made negative.
      // 3. The target period is the sum of the current period and the change amount.
      const changeAmount = this.isSweepNegated ? -(this.timer >> this.sweepShift) : this.timer >> this.sweepShift;
      this.timer = changeAmount;

      // The two pulse channels have their adders' carry inputs wired differently,
      // which produces different results when each channel's change amount is made negative:
      //   - Pulse 1 adds the ones' complement (?c ? 1). Making 20 negative produces a change amount of ?21.
      //   - Pulse 2 adds the two's complement (?c). Making 20 negative produces a change amount of ?20.
      if (this.channel === 1 && changeAmount <= 0) {
        this.timer--;
      }
    }

    this.sweepCounter ;
  }

  public write(offset: uint8, data: uint8) {
    switch (offset) {
      case 0:
        this.duty = data >> 6;
        this.isEnvelopeLoop = !!(data & 0x20);
        this.isConstantVolume = !!(data & 0x10);
        this.envelopeValue = data & 0x0F;

        this.envelopeVolume = 15;
        this.envelopeCounter = 0;
        break;
      case 1:
        this.isSweepEnabled = !!(data & 0x80);
        this.sweepPeriod = data >> 4 & 0x07;
        this.isSweepNegated = !!(data & 0x08);
        this.sweepShift = data & 0x07;

        this.sweepCounter = 0;
        break;
      case 2:
        this.timer = this.timer & 0xFF00 | data;
        break;
      case 3:
        this.timer = this.timer & 0x00FF | (data << 8) & 0x07FF;
        this.lengthCounter = LENGTH_TABLE[data >> 3];

        this.internalTimer = 0;
        break;
    }
  }

  private step(): void {
    this.counter ;

    // If at any time the target period is greater than $7FF, the sweep unit mutes the channel
    // If the current period is less than 8, the sweep unit mutes the channel
    if (!this.isEnabled || this.lengthCounter === 0 || this.timer < 8 || this.timer > 0x7FF) {
      this.volume = 0;
    } else if (this.isConstantVolume) {
      this.volume = this.envelopeValue * DUTY_TABLE[this.duty][this.counter & 0x07];
    } else {
      this.volume = this.envelopeVolume * DUTY_TABLE[this.duty][this.counter & 0x07];
    }
  }

}
5. 总结

方波几乎是 APU 里最复杂的通道了,其他通道相对简单后面就不多做介绍了,参考其他源码和 nes dev 就能写出来。简单来讲,就是提供寄存器,修改声音的相关属性
回复 支持 反对

使用道具 举报

您需要登录后才可以回帖 登录 | 立即注册

本版积分规则

QQ|Archiver|手机版|小黑屋|shangbanzu.xyz

GMT+8, 2025-5-9 04:21 , Processed in 0.069873 second(s), 23 queries .

Powered by Discuz! X3.4

© 2001-2013 Comsenz Inc.. 技术支持 by 巅峰设计

快速回复 返回顶部 返回列表